

Working with data models in EasyQuery
Data model - is a core part of any project that uses EasyQuery framework. It is a user-friendly representation of your database structure that is used by different EasyQuery components to show available entities, their attributes, conditional operators and the lists of available values during the query building process.
Before starting to add EasyQuery visual controls/widgets to your application - you will need to choose the way you create and fill the data model in your application.
There are several different options available:
-
If you your project uses Entity Framework (Core) then the best option for you will be to load the model directly from your DbContext object. For the legacy projects with the database first approach you can also load your model from a
.edmxfile. -
There is a possibility to load the model directly from your database’s meta-data (with
LoadFromConnectionmethod) -
An option for LINQ query builders only: you can load data model either from some context class or from a separate model class (especially for data filtering scenarios)
-
Finally, you can create your data model “manually” using Data Model Editor utility and save it to XML or JSON file. That file can be loaded on application’s start.
Below we will discuss all these options more in detail.
1. Load data model from a DbContext
Section titled “1. Load data model from a DbContext”This is the most preferable and the most easy way to deal with data model if your project uses Entity Framework (Core). There are two simple steps:
1.1 Install EasyQuery package for EF (Core)
Section titled “1.1 Install EasyQuery package for EF (Core)”For .NET Core project it will be Korzh.EasyQuery.EntityFrameworkCore.Relational package.
For .NET Framework 4 use Korzh.EasyQuery.EntityFramework6 pacage
1.2/1 LoadFromDbContext (for desktop applications)
Section titled “1.2/1 LoadFromDbContext (for desktop applications)”If your project is a desktop application for Windows Forms or WPF then you just need to call LoadFromDbContext(yourDbContextObject) somewhere on intialization stage of your app. Of course, you will need to initialize your DbContext object before that.
1.2/2 UseDbContext extension method for ASP.NET 4.x projects
Section titled “1.2/2 UseDbContext extension method for ASP.NET 4.x projects”If you work with ASP.NET 4.x project you can call UseDbContext method for EasyQueryOptions object in ConfigureEasyQueryOptions method of your API Controller.
Example:
protected override void ConfigureEasyQueryOptions(EasyQueryOptions options){    options.UseManager<EasyQueryManagerSql>();        .    .    .    .    .
    var dbContext = ApplicationDbContext.Create();    options.UseDbContext(dbContext);}
1.2/3 UseDbContext extension method for ASP.NET Core projects
Section titled “1.2/3 UseDbContext extension method for ASP.NET Core projects”In case of ASP.NET Core projects it’s even simplier. You just need to add UseDbContext<DbContextType> call right during the initialization of EasyQuery middleware in the Startup.Configure method:
public void Configure(IApplicationBuilder app, IHostingEnvironment env){        .    .    .    .    .
  app.UseEasyQuery(options => {        .    .    .    .    .        options.UseDbContext<AppDbContext>();    });
        .    .    .    .    .}
Additionally, there is an overload of this method which automatically excludes all ASP.NET Core Identity tables from the data model:
app.UseEasyQuery(options => { . . . . . options.UseDbContextWithoutIdentity<AppDbContext>(); });NB: If you want to use
UseDbContextWithoutIdentitymethod, you should install the additional packageKorzh.EasyQuery.EntityFrameworkCore.Identity
1.3 How to control the visibility of entities and attributes
Section titled “1.3 How to control the visibility of entities and attributes”You can control which model classes and their properties will be available in the result data model via EqEntity and EqEntityAttr attributes.
For example the following annotation will remove Report model class from the data model:
[EqEntity(false)]public class Report{ . . . .}and this one will exclude one property of some model class:
[EqEntityAttr(false)]public string QueryJson { get; set; }With the help of EqEntity and EqEntityAttr you can also define the display names of your entities and their attributes or hide them from “Columns” or “Conditions” sections.
2. Load model from a DB connection
Section titled “2. Load model from a DB connection”It’s possible to create a model based on information from database meta-data using some DbGate component and a special method of DbModel class: LoadFromConnection. This method maps all database tables to the model entities (and tables’ fields to attributes of those entities) and makes some smart tuning: hide ID fields, setup some value editors for foreign key fields, adjust the names of entities and attributes, etc.
To make it possible you will need to do the following 3 simple steps:
2.1 Installing the packages
Section titled “2.1 Installing the packages”To use this approach you will need to install the following packages:
-
One of DbGate packages depending on the database you use. EasyQuery library contains several DbGate components. Each DbGate “knows” how to read meta-data for a particular database type (SQL Server, MySQL, PostreSQL, etc). So, before loading meta-data you will need to reference some DbGate package in your project and register the corresponding DbGate class (the next step). For example, for SQL Server you will need Korzh.EasyQuery.MsSqlGate package
2.2 Register DbGate class
Section titled “2.2 Register DbGate class”The next step will be to to register the DbGate class of your choice somewhere at application’s start. Here is an example:
SqlClientGate.Register();This method is static so it can be callled only once in the static constructor of your form/page class.
In case of ASP.NET Core applicaiton you can also use RegisterDbGate method on EasyQuery services initialization in Startup.ConfigureServices method:
services.AddEasyQuery() .UseSqlManager() .AddDefaultExporters() .RegisterDbGate<SqlClientGate>() //<--- this line will register DB Gate for MS SQL Server .RegisterDbGate<MySqlGate>(); //<--- this line will register DB Gate for MySQL2.3/1 LoadFromConnection method (desktop projects)
Section titled “2.3/1 LoadFromConnection method (desktop projects)”For WPF and Windows Forms project just call LoadFromConnection method of DbModel class somewhere at your form’s initialization code.
Here is an example:
. . . .
model.LoadFromConnection(yourConnectionObject);2.3/2 UseDbConnectionLoader for ASP.NET (Core) projects
Section titled “2.3/2 UseDbConnectionLoader for ASP.NET (Core) projects”For ASP.NET (not Core) project you will need to call UseDbConnectionModelLoader in ConfigureEasyQueryOptions method of your API Controller.
protected override void ConfigureEasyQueryOptions(EasyQueryOptions options){    options.UseManager<EasyQueryManagerSql>();        .    .    .    .    .
    options.ConnectionString = ConfigurationManagerWrapper.GetConnectionString("DefaultConncetion");    options.UseDbConnection<SqlConnection>();    options.UseDbConnectionModelLoader();}
For ASP.NET Core projects you use the same piece of code but in EasyQuery’s middleware intialization:
app.UseEasyQuery(options => { . . . . . options.ConnectionString = Configuration.GetConnectionString("DefaultConncetion"); options.UseDbConnection<SqlConnection>(); options.UseDbConnectionModelLoader(); });NB: Please note that loading the model directly from DB meta data can be quite time consuming operation. If you don’t plan to modify the structure of your DB a lot - it’s better to create your model file using DME and then load the model from that file.
In both case you can pass a delegate parameter to UseDbConnectionModelLoader that will allow you to configure different loading options (for example to ignore some tables):
options.UseDbConnectionModelLoader(loaderOptions => loaderOptions .IgnoreViews() .AddTableFilter(tableInfo => !(tableInfo.Name.StartsWith("Asp") || tableInfo.Name.StartsWith("__EF"))) );In the example above our loader will ignore the views (only DB tables will be processed) and will not include the tables which names are started with Asp or __EF.
3. Loading data model from entity types
Section titled “3. Loading data model from entity types”This method is useful for data-fitlering scenarios first of all (like the one in our demo project) when you need to give your users a possibility to filter the records taken from one table via DynamicQuery extension method.
So, this way of model loading is used together with LinqQueryBuilder (for desktop applications) or EasyQueryManagerLinq (for ASP.NET or ASP.NET Core). All this functionality is provided with Korzh.EasyQuery.Linq NuGet package so you need to install it first.
You can find an example of such approach on GitHub (this is ASP.NET Core demo but it looks very similar for ASP.NET MVC application as well).
For desktop project you just need to use LoadFromEntityType extension method for your model and then call DynamicQuery method for the IQueryable for specified entity:
.   .   .   .   .//on model initializationmodel.LoadFromEntityType(typeof(Order));
.    .    .   .//later, when we want to apply the queryvar orders = dbContext.Orders        .OrderBy(o => o.Id)    .DynamicQuery<Order>(query);
4. Creating data model with Data Model Editor (DME)
Section titled “4. Creating data model with Data Model Editor (DME)”This option gives you the most control over the model’s content. As usual, this control comes with a price, which in this case is flexibility. Once created it will be quite difficult to update your data model accoring to the changes in your database. So, we suggest you to avoid this approach especially if you use Entity Framework (Core) for all database-related operations.
Here is what you need to do to create your model with DME:
4.1 Install and run Data Model Editor
Section titled “4.1 Install and run Data Model Editor”Here is the link for DME setup file. Just click on it to initiate the download process and then, when finished, open dme_setup.exe to start the installation process.
After the installation you can run DME through the Start menu. For Windows 7 you find it in All Programs | Korzh EasyQuery | Data Model Editor.
For Windows 10 just press Windows button on your keyboard and start to type “Data Model Editor”.
4.2 Create new model and establish a database connection
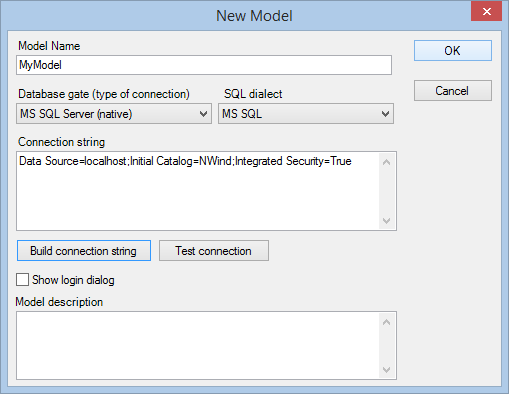
Section titled “4.2 Create new model and establish a database connection”- Use “Model | New..” menu item
- Type the name of your model (e.g. “MyModel”)
- Choose the type of database connection (e.g. “MS SQL Server (native)”)
- Enter the connection string. You can use “Build connection string” to construct the connection string visually.
- Test your database connection using “Test connection” button.
- Press OK to finish model creating
4.3 Fill the list of tables
Section titled “4.3 Fill the list of tables”After pressing OK and closing the previous dialog you will be asked to add database tables into your model. Click “Yes” to agree and the Select Tables dialog will appear.
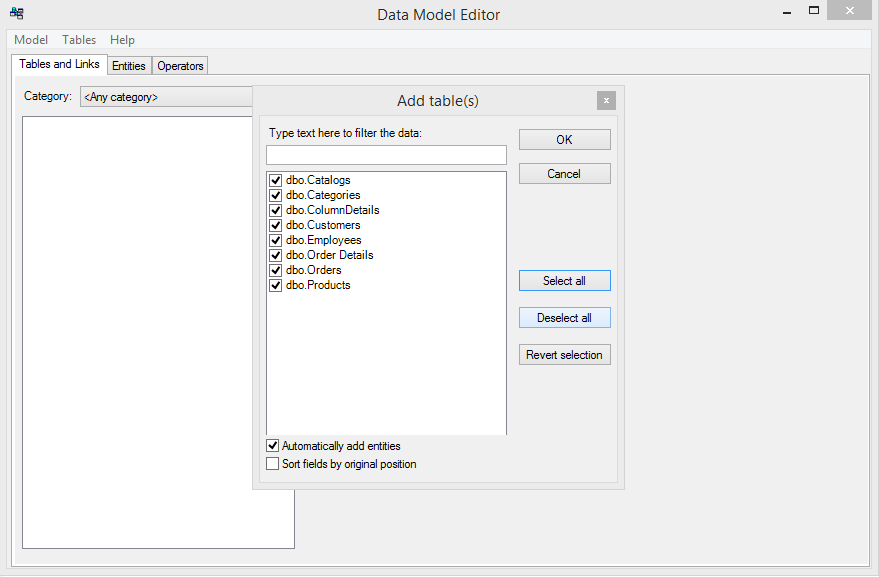
Select the tables you want to add into your model (select all of them if you don’t have any limitations) and press OK to add them.
4.4 Establish the link between tables
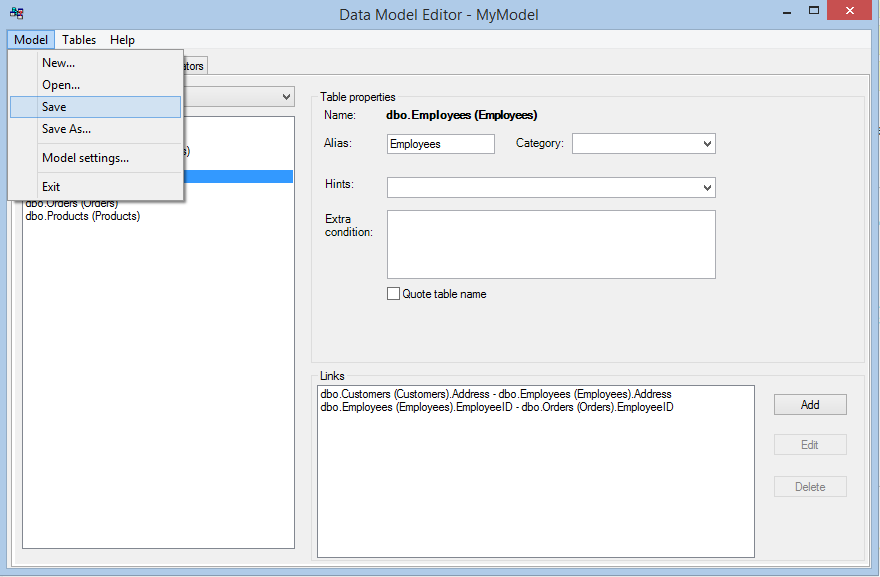
Section titled “4.4 Establish the link between tables”DME will offer you to add the links automatically using information about foreign keys or (if foreign keys are not defined in you DB) a special algorithm which searches for field pairs in all added tables (e.g. table1.customerID → table2.customerID). Select “Yes” to start that process. When it is finished you can check added links for each table in “Links” list box.
4.5 Save your data model into XML
Section titled “4.5 Save your data model into XML”That’s all. The initial setup has been finished. Use “Model | Save..” menu item to save your model into an XML file or JSON file.
4.6 Add the code that loads the model file in your app
Section titled “4.6 Add the code that loads the model file in your app”The best way will be to place the file created on the previous step into App_Data folder of your project.
For desktop applications you can load that file using LoadFromXmlFile() or LoadFromJsonFile() methods of DbModel class.
For ASP.NET (Core) projects you will need to setup a FileModelLoader in the controller’s (middleware’s) initialization part:
options.UseModelLoader((_) => new FileModelLoader("App_Data"));The loader will look for the file with a “model ID” name and .xml or .json extension.
5. Custom model loader
Section titled “5. Custom model loader”In ASP.NET (Core) applications you can attach a custom model loader to your EasyQuery controller or middleware. All you need to do is to create a new class that implements IModelLoader interface:
public class CustomModelLoader : IModelLoader{
    public CustomModelLoader()    {    }
    public async Task<bool> LoadModelAsync(DataModel model, string modelId)    {      var modelXml = //get the XML of your model by its ID    model.LoadFromXmlString(modelXml);        return true;    }}
after that, you just register the resolver for the new model loader in ConfigureEasyQueryOptions method (for ASP.NET) or inside app.UseEasyQuery(...) call (for ASP.NET Core):
options.UseModelLoader(services => new CustomModelLoader());6. Using EasyQuery API to fill a data model object
Section titled “6. Using EasyQuery API to fill a data model object”Finally, you can build your data model object dynamically using the structures, classes and functions provided by EasyQuery API. Here is an artcile that describes how to do it: Creating data model dynamically with code