ASP.NET Core default project structure explained (part 2)

This is the second part of the article, where we take apart the default ASP.NET Core solution template piece by piece and try to explain the purpose of each part and how exactly it works. You can consider it as a reference where you can check why a particular part was added to your project and find a link to the relevant documentation that explains it in detail.
Startup class
As we already mentioned in the first article, the Startup class is the entry point for all initialization codes in your application. Long story short, the Startup defines what your application will do and how exactly it will work.
By default, any Startup class in the ASP.NET Core application includes three main parts:
-
The constructor where you can define some internal variables, set up some configuration settings, or perform application-wide initializations. For example, we suggest our users set here their license keys for our EasyQuery library.
-
ConfigureServices method. Here we register all necessary services in the DI (dependency injection) container and define the configuration settings for some of them. In case you are not aware of what Dependency Injection is, here is an article on our blog that explains this concept in simple words.
-
Configure method. This is the stage when you set up the middleware pipeline for your project.
Both ConfigureServices and Configure methods are called automatically while the application starts. You just need to define the services and the middlewares there correspondingly.
Now, let’s take a look at each of these sections more in detail.
Startup class constructor
The default ASP.NET Core project template contains only the following one line of code in the constructor:
        public Startup(IConfiguration configuration)
        {
            Configuration = configuration;
        }
It just saves in the class property the configuration object passed here by the DI container, so we can use it in other methods. In the first article, we have already considered the configuration mechanism used in ASP.NET Core applications.
ConfigureServices method
As it was mentioned before, the ConfigureServices method contains the function calls that register different application services in the DI container.
These can be authentication/authorization services, MVC or Razor Pages engine, the classes for working with DB, or any other possible services.
The only parameter of the ConfigureServices method has IServiceCollection type that represents a list of ServiceDescriptor items.
Each of those items maps some type (usually an interface) to a particular implementation of this type.
According to the interface, we can use only usual IList or ICollection functions like Add, AddRange, Remove, and other methods.
However, as you have already noticed, ConfigureServices contains such calls as services.AddDbContext, services.AddRazorPages, and similar.
You may ask, “How is it possible?” The answer is extension methods. Each sub-system used in our project (like Entity Framework Core or MVC engine) defines an extension method (sometimes even a few) for the IServiceCollection interface to simplify the registration in the DI and configuration of the services available in that sub-system.
NB: Please note that the order of the services you register in the ConfigureServices method is not important.
This method is executed only once upon your application start.
So, let's take a closer look at the default ConfigureServices’ content.
public void ConfigureServices(IServiceCollection services)
{
    services.AddDbContext<ApplicationDbContext>(options =>
        options.UseSqlServer(
            Configuration.GetConnectionString("DefaultConnection")));
    services.AddDefaultIdentity<IdentityUser>(options => options.SignIn.RequireConfirmedAccount = true)
        .AddEntityFrameworkStores<ApplicationDbContext>();
    services.AddRazorPages();
}
So, there are only three calls there: AddDbContext, AddDefaultIdentity, and AddRazorPages. Let’s inspect each of them separately.
AddDbContext
This method is provided by the Entity Framework Core framework. It registers and configures our database context. The Actiondelegate passed in the parameter allows us to define the parameters of this DbContext. For example, with UseSqlServer call, we tell our DbContext to use a particular type of connection (SqlConnection) with a particular connection string. The connection string itself is taken from the configuration so it can be easily changed in Development or Production environments. You can find the default connection string in the appsettings.json configuration file, which we already analyzed in the first article.
A few words about the “Builder” pattern
You may have noticed an interesting way of passing settings for DbContext. Instead of sending an object with options, we use a procedure (Action) with one-parameter options of the DbContextOptionsBuilder type.
That's because, to construct the DbContext settings properly, Entity Framework Core uses the Builder Pattern.
This pattern is helpful when you need to perform several steps to construct some complex objects and simply defining a class or structure is not enough. For example, when you need to call some methods depending on the settings in the configuration.
As it happens in our case with UseSqlServer().
There is one more reason why we use a delegate (function) instead of a plain object. There may be a situation when you don't need that service (DbContext) at all. For example, your web app has some actions that do not require database access. The DbContext object will never be created for such requests, and so, we will not need to set its options. The good thing about a delegate is that it can be called exactly when you need to construct the necessary object.
I paid so much attention to this pattern because it is used quite often, especially in the process of registering services in DI (and we will use that for the next function call as well).
AddDefaultIdentity
The second function call in the ConfigureServices was added here because of the Authentication option we turned on when creating our project.
It registers a bunch of services for authentication and authorization tasks such as IUserStore, IRoleStore, IPasswordHasher, UserManager, SignInManager, and many others.
The are all part of the ASP.NET Core Identity sub-system.
This method also uses the Builder Pattern, but in a slightly different way. Instead of passing the builder in the delegate’s parameter, this function returns an IdentityBuilder object, so you can call other functions with simple chaining.
The only function called there is AddEntityFrameworkStores.
It tells ASP.NET Identity where to store all the entities required for auth tasks (users, roles, claims, etc.).
As the name of the method suggests, we will use our Entity Framework services for these tasks.
The type of parameter in this method (between < .. >) defines the DbContext class used to store all auth objects.
AddRazorPages
The last function call in the ConfigureServices adds the services necessary for Razor Pages engine.
It appears here because of the template we chose at the beginning.
If we had selected a template with Model-View-Controller approach at that point, we would have had something like services.AddMvc() here.
Configure method
The last method in the Startup class defines the middleware pipeline of our ASP.NET Core program. If you don't know what a middleware pipeline is, you might want to learn more about it because it determines how your web application handles HTTP requests.
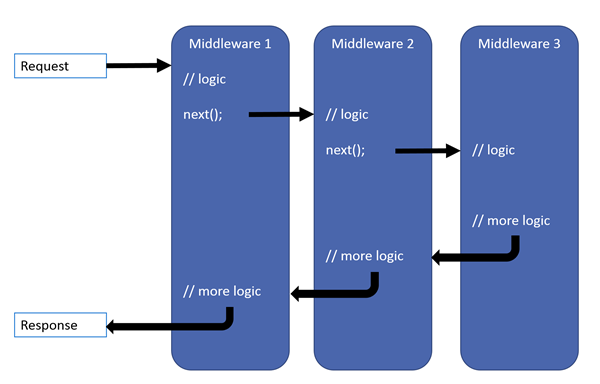
Unlike the services registered in ConfigureServices (remember, their order is not important), the order of middlewares defined in Configure has crucial significance. As you can see from the picture above, the first defined middleware is called for each request while every next one in the pipeline processes only those requests that were not processed by the middlewares defined before it.
So at the beginning of the pipeline, we need to place the middlewares that are necessary for auxiliary tasks (like logging or authentication) and that don’t consume a lot of memory and processing time.
Let’s take a look at the default implementation of this method for the chosen project template:
        public void Configure(IApplicationBuilder app, IWebHostEnvironment env)
        {
            if (env.IsDevelopment()) {
                app.UseDeveloperExceptionPage();
                app.UseDatabaseErrorPage();
            }
            else {
                app.UseExceptionHandler("/Error");
                app.UseHsts();
            }

            app.UseHttpsRedirection();
            app.UseStaticFiles();

            app.UseRouting();

            app.UseAuthentication();
            app.UseAuthorization();

            app.UseEndpoints(endpoints => {
                endpoints.MapRazorPages();
            });
        }
So, let’s go through the middlewares defined here one by one.
Exception handling and security transport
The first lines define different middlewares for Development and Production modes. If we are in the Development mode, we define the middlewares that catch all exceptions in the pipeline and show a special page with extra information about the error (exception message, stack trace, etc.).
It's possible to do because (as you can see from the image above) the processing of the request is returned to the first middleware in the pipeline before being sent back to the client.
In the Production mode, we also catch all exceptions and then re-execute the request with the specified path (‘/Error’ in our case).
The second call executed only in Production is UseHsts. It adds a middleware that implements HTTP Strict Transport Security Protocol.
The next in the pipeline is HTTPS redirection middleware (app.UseHttpsRedirection).
The name is self-explanatory. It just redirects all HTTP requests to HTTPS ones.
These two middlewares (app.UseHsts and app.UseHttpsRedirection calls) are added because of the Configure for HTTPS option we turned on (actually, it was turned on by default) during the project creation.
Processing static files (UseStaticFiles)
The next middleware (added by the app.UseStaticFiles() call) takes care of all static files.
Simply put, if the application gets a request for some .js, .css, or an image file (.png, .jpg, etc.),
this middleware looks for a file with the requested name inside wwwroot folder and returns it in response (if the file was found).
If not, it sends back a response with a 404 status code (“not found”).
There are overloads of UseStaticFiles that allow us to define another root folder for static files and set some other options.
Routing (UseRouting and UseEndpoints)
The next pair of middlewares are, maybe, the most important ones in the pipeline, since they define the routing for all other endpoints in your web app.
In simple words, they match a particular request to a particular endpoint, a piece of executable code that handles the request.
So, how exactly does it work?
In the Configure method, we call app.UseRouting() to add EndpointRoutingMiddleware to our pipeline.
After that, we call app.UseEndpoints() to add EndpointMiddleware to the pipeline and define the endpoints. Each endpoint is an object that contains (as mentioned above) a delegate (so, a piece of code) that actually handles the request, plus some metadata (like an authorization policy).
We can use such extension methods as MapGet, MapPost, and others to add an endpoint that matches a particular request path or a path template. For example, the following pattern /something/{path*}, will be matched for all requests started with /something/.
Additionally, other services can define their own extension functions that are used to create necessary endpoints. For example, you can use the MapRazorPages function for Razor Pages or MapHub for SingleR. In our EasyData library we defined MapEasyData function that adds an endpoint for the API that processes all CRUD operations.
When our web app gets a new request (and it’s not processed by any middleware defined before UseRouting), the EndpointRoutingMiddleware matches it to some endpoint. So, one endpoint among all defined at the application start is becoming selected at that moment.
Then EndpointMiddleware actually calls the endpoint’s delegate to handle the request.
Other middlewares that are added after app.UseRouting() but before app.UseEnpoints() can see which endpoint is selected
and can change something (e.g., to apply an authorization policy) before EndpointMiddleware dispatches to the selected endpoint.
Authentication/Authorization (UseAuthentication, UseAuthorization)
These two middlewares are added in the Configure because of the Authentication option we turned on when we created our project.
As already mentioned above, they already know which endpoint is selected and so can add some additional identity-related information to the request’s context (like filling its User property) or redirect to the “sign-in/sign up” pages if the current request is anonymous but the selected endpoint requires authorization.
Wrapping Up
So, in this article, I tried to cover all pieces of one of the most-used ASP.NET Core application templates and figure out why they are used and how they work (from a very general point of view).
I hope this information will help you better understand the internal mechanism of the ASP.NET Core framework and make your code more clear and efficient.
Thanks for the reading, and take care!